Server BIOS and BMC Setup
Required BIOS and BMC settings for all servers in the AIsware cluster. Complete these before installing the operating system.
BMC configuration
Common to all servers — run through the BMC web interface.
Configuration › Account Services — create the following users:
| User name | Password | Network privilege | Account types |
|---|---|---|---|
operator | unique per machine | Operator | Redfish/IPMI |
metrics | observability password | User | Redfish/IPMI; SNMP (Auth: HMAC-MD5, Auth Key: observability password, Encryption: None) |
Configuration › Notifications › SNMP:
| Setting | Value |
|---|---|
| Enable SNMP | On |
| SNMPv3 | On |
| Auth | HMAC_MD5 |
| Encryption | None |
Configuration › Network › Port:
| Setting | Value |
|---|---|
| SNMP Port | On |
Configuration › BMC Settings:
| Setting | Value |
|---|---|
| Host Interface | Off |
Host Interface can only be set from the OS or EFI shell — setting it from the BIOS throws an error. Setting it to Off restricts OS-level IPMI access so that unprivileged OS users cannot add or change accounts or upgrade firmware (equivalent to KCS Control: Operator).
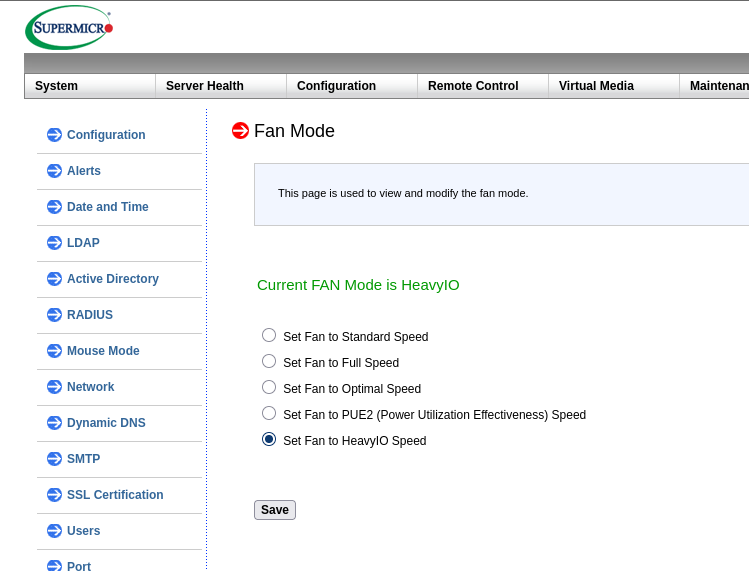
Machines that contain GPUs or network cards should set their fan mode accordingly to help cool these cards. Go to BMC setting — Configuration › Fan Mode:
| Setting | Value |
|---|---|
| Fan Mode | HeavyIO Speed |
Secure Boot key enrollment
Only required when Secure Boot is required and when it is not in factory-default state, for example, after a firmware reset or key clear. Note that if the server is re-provisioned, some steps need to be done again.
- In BIOS, navigate to Security › Secure Boot, set CSM Support to Disabled, then open Key Management and perform the following sequence:
- Factory Key Provision: Enabled → Install factory defaults: Yes → Reset without saving: No
- Factory Key Provision: Disabled — select Disabled again to toggle it off after the factory restore
- Reset To Setup Mode: Yes → Reset without saving: No
- Esc, then Save Changes and Reset
- From an Arch Linux machine, install and copy
sbctlto the target host:sudo pacman -S sbctlscp /usr/bin/sbctl root@<host>:/usr/local/bin/ - On the target host, confirm Setup Mode is active:
sbctl status# Installed: ✓ sbctl is installed# Setup Mode: ✗ Enabled# Secure Boot: ✗ Disabled# Vendor Keys: none
- Enroll keys and reboot:
sbctl create-keys # skip if keys already exist at /usr/share/securebootsbctl enroll-keys -mreboot
- In BIOS: Security › Secure Boot › Enter Deployed Mode, set Secure Boot to Enabled, then Save and Reset.
- Verify enrollment:
sbctl status# Installed: ✓ sbctl is installed# Setup Mode: ✓ Disabled# Secure Boot: ✓ Enabled# Vendor Keys: microsoftmokutil --pk | grep Issuer # must not show "DO NOT TRUST - AMI Test PK"
After enabling Secure Boot, the nVidia GRID host driver must be reinstalled (rebuilt). The build generates a Machine-Owned Key (MOK) that must be enrolled on the next reboot via the "Perform MOK management" menu. To re-enroll an existing MOK without rebuilding the driver:
mokutil --import /var/lib/shim-signed/mok/MOK.der
# On reboot: Enroll MOK → Continue → Yes → <MOK password> → Reboot
# Verify:
mokutil --list-enrolled | grep Issuer
BIOS settings
To reboot directly into the BIOS setup screen from a running OS:
systemctl reboot --firmware-setup
SuperMicro 5019
| BIOS path | Setting | Value |
|---|---|---|
| Advanced › Boot Feature | Wait For "F1" If Error | Disabled |
| Advanced › NB Configuration | IOMMU | Enabled |
| Advanced › PCIe/PCI/PnP Configuration | SR-IOV Support | Enabled |
| Advanced › PCIe/PCI/PnP Configuration | PCIe ROM types | EFI (all) |
| Advanced › PCIe/PCI/PnP Configuration | Network Stack | Enabled |
| Advanced › PCIe/PCI/PnP Configuration › Network Stack Configuration | IPv4 PXE Support | Enabled |
| Advanced › PCIe/PCI/PnP Configuration › Network Stack Configuration | IPv6 PXE Support | Disabled |
| Advanced › PCIe/PCI/PnP Configuration › Network Stack Configuration | HTTP Support (all options) | Disabled |
| Security › Secure Boot | CSM Support | Disabled |
| Boot | Boot mode select | UEFI |
Save and reset after the PCIe/PCI/PnP changes before continuing to the Secure Boot and Boot settings — some firmware versions require a reboot for the Network Stack sub-menu to appear.
Boot priority: #1 UEFI Hard Disk, #2 UEFI Network, #3 UEFI Built-in EFI Shell, #4–#9 Disabled. Under UEFI Network Drive BBS Priorities, disable all entries except the first.
SuperMicro 1115 and 4125
| BIOS path | Setting | Value |
|---|---|---|
| Advanced › Boot Feature | Wait For "F1" If Error | Disabled |
| Advanced › NB Configuration | IOMMU | Enabled |
| Advanced › NB Configuration | Power Profile Selection | Efficiency Mode |
| Advanced › PCIe/PCI/PnP Configuration | Above 4G Decoding | Enabled |
| Advanced › PCIe/PCI/PnP Configuration | Re-Size BAR Support | Enabled (required if GPUs are installed) |
| Advanced › PCIe/PCI/PnP Configuration | SR-IOV Support | Enabled |
| Advanced › Network Configuration | IPv6 PXE Support | Disabled |
| Advanced › Network Configuration › 1st NIC › IPv4 Network Configuration | Configured | Enabled |
| Advanced › Network Configuration › 1st NIC › IPv4 Network Configuration | Enable DHCP | Enabled |
| Security › Secure Boot | CSM Support | Disabled |
Boot priority and UEFI Network Drive BBS Priorities: same as 5019 above.
SuperMicro AS-1115CS, ASG-2115S, and AS-8126GS-NB3RT
GPU hypervisor servers.
| BIOS path | Setting | Value |
|---|---|---|
| Advanced › Boot Feature | Wait For "F1" If Error | Disabled |
| Advanced › CPU Configuration | Workload Profile | Virtualization (Hypervisors) (AS-1115CS and AS-8126GS-NB3RT only) |
| Advanced › NB Configuration | IOMMU | Enabled |
| Advanced › NB Configuration | DMAr Support | Enabled |
| Advanced › NB Configuration | Power Profile Selection | Auto (High-performance mode) |
| Advanced › PCIe/PCI/PnP Configuration | Above 4G Decoding | Enabled |
| Advanced › PCIe/PCI/PnP Configuration | Re-Size BAR Support | Enabled (required if GPUs installed) |
| Advanced › PCIe/PCI/PnP Configuration | SR-IOV Support | Enabled |
| Advanced › Network Configuration | IPv6 PXE Support | Disabled |
AS-8126GS-NB3RT machines have BlueField-3 NICs. For each NIC port, under Advanced › Nvidia Network Adapter:
| Path | Setting | Value |
|---|---|---|
| NIC Configuration | Legacy Boot Protocol | None |
| Device Level Configuration | Virtualization Mode | None |
| Device Level Configuration | PXE Boot Filters | Enabled |
| BlueField Internal CPU Configuration | Internal CPU Offload Engine | Disabled (1st port only) |
| (top level) | Network Link Type | Ethernet |
Virtualization Mode: None enables SR-IOV with 8 virtual functions per port. Internal CPU Offload Engine must be Disabled on the 1st port only.
For GPU servers — create the OS boot RAID array before first boot via Advanced › BROADCOM SAS 3808N Configuration Utility › Configure › Create Virtual Drive:
- RAID Level: RAID1
- Media Type: SSD, Interface Type: NVMe
- Select drives C0:01:00 and C1:01:01 → Apply Changes
- Save Configuration: Confirm Enabled → Yes → OK
Boot priority and UEFI Network Drive BBS Priorities: same as 5019 above.
MS-01 (Intel AMT)
The MS-01 uses Intel Active Management Technology (AMT) for out-of-band management instead of a dedicated BMC.
BIOS update
If the installed BIOS version is below v1.27, update it first:
- Format a USB stick with a single EFI FAT32 partition.
- Place the UEFI shell binary on the partition.
- Download and unpack the MS-01 BIOS v1.27 package onto the same partition.
- In BIOS setup, disable Security › Secure Boot.
- Reboot into the EFI shell (force it from the BIOS boot menu if it does not boot automatically).
- Run
AfuEfiFlash.nsh.
AMT setup
- Enter the BIOS setup screen and open MEBx (Intel Management Engine BIOS Extension).
- Set the AMT password — default credentials are
admin/admin. Store the new password securely. - Open AMT Network Setup and assign a static IP. Record the address in the static IP inventory for BMC devices.
BIOS settings
| BIOS path | Setting | Value |
|---|---|---|
| Advanced › Onboard Devices | Aperture Size | 128 MB |
| Advanced › Onboard Devices | HD Audio | Disabled |
| Advanced › Onboard Devices | Deep S5 | Disabled |
| Advanced › Onboard Devices | SR-IOV | Enabled |
| Advanced › Onboard Devices | Above 4G Decoding | Enabled |
| Advanced › Onboard Devices | Re-Size BAR Support | Enabled |
| Advanced › Onboard Devices | DMA Control Guarantee | Enabled |
| Advanced › Onboard Devices | SA GV | Disabled |
| Advanced › ACPI Settings | Restore On AC Power Loss | Always On |
| Advanced › ACPI Settings | Wake Up On LAN | Enabled |
| Advanced › HM Monitor & Smart Fan | CPU Fan Smart Mode | Full Mode |
| Advanced › HM Monitor & Smart Fan | M.2 Fan 1 Smart Mode | Full Mode |
| Advanced › HM Monitor & Smart Fan | M.2 Fan 2 Smart Mode | Full Mode |
| Advanced › Network Stack Configuration | Network Stack | Disabled |
| Advanced › Network Stack Configuration | IPv4 PXE Support | Disabled |
| Advanced › Network Stack Configuration | IPv6 PXE Support | Disabled |
| Security | Secure Boot | Disabled (BIOS update and OS install); Enabled (post-install) |
AMT activation
After completing the BIOS settings:
- In the AMT BIOS menu, set Network Access State to Network Active.
- In the AMT BIOS menu, open the User Consent menu and set:
- User Opt-in: None
- Opt-in Configurable from Remote IT: Enabled
Connecting via AMT
Use MeshCommander (bundled in the meshcmd tool) to connect to an AMT device:
wget "https://alt.meshcentral.com/meshagents?meshcmd=6" -O meshcmd
chmod +x meshcmd
./meshcmd MeshCommander
Open http://localhost:3000, then:
- Add Computer
- Fill in:
- Friendly Name: name matching the inventory
- Hostname:
<inventory-name>.<environment-tld>— the DHCP/DNS entry configured in the routers - Auth / Security: Digest / TLS
- OK, then Connect