Recovering a locked RBD volume
Unlock a Ceph RBD volume stuck after a VM hard crash
When a VM crashes hard (for example, due to a hypervisor failure), it may leave a stale exclusive lock on its underlying Ceph RBD volume(s), with the following symptom(s):
- OpenStack reports the volume as
availablebut it cannot be deleted (even if the VM that was attaching it is shut down or deleted) or successfully attached and mounted - the VM is stuck at boot because it can not write to its own disks (for example, it can not fsck its root disk), as in the screenshot below:
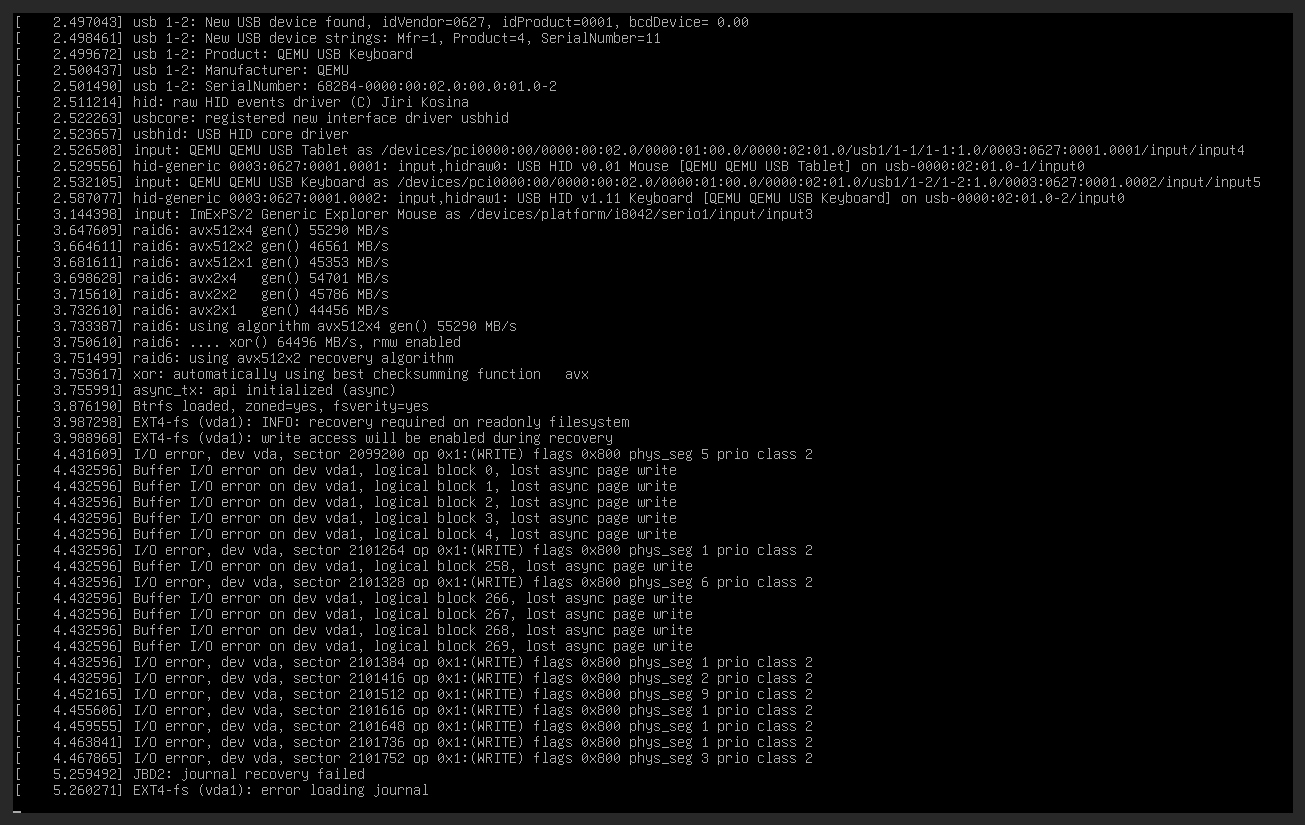
This runbook describes how to identify the stale lock, remove it, and restart the VM or delete the volume(s).
Prerequisites Checklist
- to clear the lock:
- SSH +
sudoaccess to a Ceph monitor node (ceph_mon_hostsin inventory)
- SSH +
- to confirm the VM volumes, either:
- SSH +
sudoaccess to the compute node running (or that ran) the VM - or access to the OpenStack UI
- SSH +
- to restart the VM or delete volumes, either:
- OpenStack CLI configured and authenticated (for example, in
deployment0using the deployment container) - or access to the OpenStack UI
- OpenStack CLI configured and authenticated (for example, in
All rbd commands in this runbook must be run inside a cephadm shell. Connect to any monitor node and enter the shell before starting:
ssh <ceph-node>
sudo cephadm shell
Step 1: Identify the affected VM and/or volume(s)
From the openstack UI or console, let us get the VM and volume(s) UUID.
First, get the VM UUID:
openstack server list --all --name flo-crash-test-dummy -f value -c id -c name
c3c87ece-0ac1-4d22-974f-902be4bcf0a2 flo-crash-test-dummy
Our VM UUID is c3c87ece-0ac1-4d22-974f-902be4bcf0a2. Use it to get the VM details:
openstack server show c3c87ece-0ac1-4d22-974f-902be4bcf0a2
+-------------------------------------+-----------------------------------------------------------------------------------------------+
| Field                               | Value                                                                                         |
+-------------------------------------+-----------------------------------------------------------------------------------------------+
| OS-DCF:diskConfig                   | MANUAL                                                                                        |
| OS-EXT-SRV-ATTR:host                | gpu1                                                                                          |
| OS-EXT-SRV-ATTR:hostname            | flo-crash-test-dummy                                                                          |
| OS-EXT-SRV-ATTR:hypervisor_hostname | gpu1                                                                                          |
| OS-EXT-SRV-ATTR:instance_name       | instance-00000dc5                                                                             |
| OS-EXT-SRV-ATTR:kernel_id           |                                                                                               |
| OS-EXT-SRV-ATTR:launch_index        | 0                                                                                             |
| OS-EXT-SRV-ATTR:ramdisk_id          |                                                                                               |
| OS-EXT-SRV-ATTR:reservation_id      | r-gj34c0pq                                                                                    |
| OS-EXT-SRV-ATTR:root_device_name    | /dev/vda                                                                                      |
...
| description                         | flo-crash-test-dummy                                                                          |
| hostId                              | de8ecfe60d203e4c5e676e0d60037a7ba394fd8b6e5e848ddd54b705                                      |
| host_status                         | UP                                                                                            |
| id                                  | c3c87ece-0ac1-4d22-974f-902be4bcf0a2                                                          |
| image                               | Ubuntu Server Noble LTS (Cloud) raw (74d974a4-3060-40dd-9e9e-fe9b29825f23)                    |
| key_name                            | vm-flo-crash-test-dummy-d6c78a27-63b5-41b4-94dd-32902bb90116                                  |
| locked                              | False                                                                                         |
| locked_reason                       | None                                                                                          |
| name                                | flo-crash-test-dummy                                                                          |
...
| volumes_attached                    |                                                                                               |
+-------------------------------------+-----------------------------------------------------------------------------------------------+
Note the VM instance_name, as well as any volumes_attached.
In this case: instance_name is instance-00000dc5, and we don't have extra volumes.
You can also confirm the volume status with:
openstack volume list --all --long
Step 2: Check whether a VM holds the volume
Check whether the volume is still attached to a VM in OpenStack:
openstack volume show <volume-id>
Look at the attachments field. If a server is listed, check its status:
openstack server show <server-id>
Expected state for a crashed VM: ERROR or SHUTOFF.
Step 3: Confirm the VM is not actively running
Before touching the Ceph lock, confirm that the volume is not in use.
If the VM is in ERROR or SHUTOFF state, it is safe to proceed. If the VM is ACTIVE, shut it down first:
openstack server stop <server-id>
Wait for the VM to reach SHUTOFF before continuing:
openstack server show <server-id> | grep status
Step 4: Find the RBD image and its lock status
SSH to the compute node and dump the libvirt XML to find the exact pool and image names:
virsh dumpxml <instance_name> | grep rbd
For example:
# virsh dumpxml instance-00000dc5 | grep rbd
      <source protocol='rbd' name='vms/c3c87ece-0ac1-4d22-974f-902be4bcf0a2_disk'>
      <source protocol='rbd' name='vms/c3c87ece-0ac1-4d22-974f-902be4bcf0a2_disk.config'>
Note the pool (vms) and the image names (vms/<instance-uuid>_disk and vms/<instance-uuid>_disk.config).
Back on the Ceph monitor node (inside cephadm shell), confirm the lock:
rbd lock list <volume name>
For example:
rbd lock list vms/c3c87ece-0ac1-4d22-974f-902be4bcf0a2_disk
There is 1 exclusive lock on this image.
Locker         ID                    Address
client.798189  auto 126489337364128  10.30.0.14:0/1684650053
rbd lock list vms/c3c87ece-0ac1-4d22-974f-902be4bcf0a2_disk.config
There is a lock on the VM root disk (but not on the config disk) that was preventing the VM from starting up.
Step 5: Create a backup of the volume(s)
To protect against data loss (for example, by fsck during the VM restart), let's create a snapshot of the affected volume(s):
rbd snap create vms/<instance-uuid>_disk@pre-recovery-$(date +%Y%m%d)
To roll back to it if something goes wrong:
- When the volume is not mounted (no active VMs using it)
rbd snap rollback vms/<instance-uuid>_disk@pre-recovery-20260605
Step 6: Remove the stale RBD lock
List the locks on the volume(s):
rbd lock list vms/<instance-uuid>_disk
Example output with a stale lock:
There is 1 exclusive lock on this image.
Locker         ID                    Address
client.798189  auto 126489337364128  10.30.0.14:0/1684650053
Remove the lock using the Locker and ID values from the output. The ID may contain a space, so always quote it:
rbd lock remove vms/<instance-uuid>_disk "<id>" <locker>
For example:
rbd lock remove vms/c3c87ece-0ac1-4d22-974f-902be4bcf0a2_disk "auto 126489337364128" client.798189
Confirm the lock is gone:
rbd lock list <name>
i.e:
rbd lock list vms/c3c87ece-0ac1-4d22-974f-902be4bcf0a2_disk
Expected output: empty.
Step 7: Recover VMs
If the goal is to bring the VM back into service, restart it via OpenStack or the AIsware Console.
openstack server start <server-id>
Monitor the VM until it reaches ACTIVE:
openstack server show <server-id> | grep status
Verify the volume is accessible inside the VM.
Step 8: Clean up
Once recovery is confirmed, remove the volume snapshot(s):
rbd snap rm vms/<instance-uuid>_disk@pre-recovery-<date>
For example:
rbd snap rm vms/c3c87ece-0ac1-4d22-974f-902be4bcf0a2_disk@pre-recovery-20260605
Troubleshooting
VM fails to restart after lock removal
Check the VM console log for errors:
openstack console log show <server-id>
If the disk was corrupted by the crash, the VM may need to be rebuilt rather than restarted.
Annex: Practicing this runbook / reproducing
In order to simulate a hypervisor crash in QA environment, one needs to send the KILL signal to the QEMU process in charge of the VM.
The prerequisites are the same as this runbook (ssh + sudo access to hypervisor nodes)
- Create a VM in AIsware Console
- find its hypervisor host and instance name (here,
gpu0andinstance-00000dc5) - ssh to the hypervisor host
- find the PID of the qemu hypervisor process, for example:
sudo ps aux | grep instance-00000dc5 | grep -v grep
42436     745972  4.2  1.0 20016640 2721160 ?    Sl   08:47   2:59 /usr/bin/qemu-system-x86_64 -name guest=instance-00000dc5,debug-threads=on -S [...]
The PID is the second output field: 745972
- send this PID the KILL signal:
sudo kill -9 745972